
Share Files from Windows to iPad using Raspberry Pi
Sharing files between Windows and iPad is easy with Raspberry Pi. Here’s how to set it up in less than an evening.
Have you ever been reading a long PDF or document on your PC and just wanted to go lie in bed and finish reading it on your iPad as you nod off to sleep? Or maybe your PC is downloading video files and you’d like to be able to access those files from your iPad when they’re ready? Getting those files from your PC to the iPad can be a pain. If you have a Raspberry Pi with some extra space on the SD card though, you can easily share files between a Windows PC and an iPad. And if you don’t have a Raspberry Pi, you can get a Raspberry Pi with Wi-Fi that will work for this purpose for under $60. (Don’t forget to get an SD memory card as well.)
The Raspberry Pi can serve as an intermediary storage location for files, and both Windows PC’s and iPad’s can access that storage. Technically, what you’ll be doing is configuring your Pi to become a network-attached storage server, or NAS server. Everything you need is built into Raspberry Pi, Windows, and iPadOS. You just need to configure the devices.
Leverage Your Existing Home Network
Because your PC, your iPad, and your Pi are all on your home network, they can all exchange information between themselves on your home network. The devices communicate using a network protocol called SMB. The most popular and long-lived software that leverages this protocol is called Samba. Samba is free under the GNU General Public License, it’s been around since 1992, is actively maintained, and is widely used. Samba actually does much more than provide file transfer and storage capabilities. It also provides print services, user authentication, and a bevvy of other services. File transfers and storage is what I’ll focus on in this article.
For file services, Samba uses a traditional client-server architecture. In this scenario the Pi’s role is to act as the server. The Windows PC and the iPad will be clients. The clients access the server, not each other directly. To get this working, the Pi needs to be configured as a Samba server, and the Windows PC and iPad need to have SMB Client capability. SMB Client capability has been in Windows (and even DOS) for quite a while. With iPadOS 13 and iOS 13 Apple has added SMB Client capabilities to the File app so we can now use Samba to facilitate file-sharing between Windows PC’s and iPad’s.
Setting up Raspberry Pi as a NAS Server
I’ll start with setting up the server first so that the clients have something to connect to (of course). To do this, I’ll use the Terminal command line on the Raspberry Pi. You can access the Pi’s Terminal a number of different ways. If you have a keyboard and monitor connected to your Pi, of course it’s right there. If not, you can SSH into your Pi using PuTTY or your favorite SSH client. My preferred method is to use VNC. I use VNC to access the GUI, and there’s a Terminal icon there on the taskbar. However you get there is fine.
Checking Free Space on Raspberry Pi
To see how much space you have available to use as shared storage, type this command:
user@piname: ~$ df -h
You should see an output similar to this:
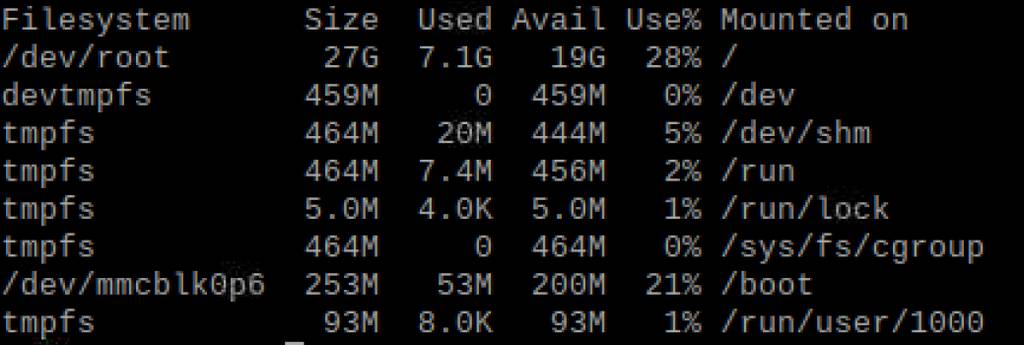
My Pi is serving as my DIY Weather Clock. That doesn’t consume a significant portion of the SD card. On my Pi, I have 19 Gigabytes of storage space just sitting there doing nothing! This is perfect. I can have the Pi do double-duty to store files I want to share between Windows and my iPad.
Before installing anything new, it’s good practice to update your packages. This ensures you are working with the latest versions of everything.
user@piname: ~$ sudo apt-get update
If you want to install any upgrades you need, now is when most people do that. You can do it now, or skip it. It’s not really needed to install Samba.
user@piname: ~$ sudo apt-get upgrade
Now, we’ll install Samba. Use this command:
user@piname: ~$ sudo apt-get install samba samba-common-bin
During the installation, you may be prompted with a question about DHCP. You can answer Yes to this question. After the installation completes, the next thing to do is to tell Samba what location on the card to share. So first, I’ll create a new directory to serve as the storage space. Make a new directory, you choose the name. Mine is ‘xfer’.
user@piname: ~$ mkdir -m 777 /xfer
The ‘-m 777’ creates the directory with full read/write/execute permission for everyone. If you want to limit it to read and write only, use ‘-m 666’ instead.
Now, to configure Samba to share that directory, edit the file /etc/samba/smb.conf. When Samba installs, this file is created as read-only, so set the file to have write permissions.
user@piname: ~$ cd /etc/samba/
user@piname: ~$ sudo chmod +w smb.conf
Then open the file using any text editor you like:
user@piname: ~$ mousepad /etc/samba/smb.conf
smb.conf is a long file which Samba reads when it starts to configure itself. You can read through the comments and make any changes you like. The defaults in the file are fine, so if in doubt about a particular setting, don’t change it now. You can always change it later if you need. I made one change near the bottom of the file. Since I’m transferring files, not just hosting them, I want users to be able to read and write. By default they are read only. I changed this option to ‘no’.
# By default, the home directories are exported read-only. Change the
# next parameter to 'no' if you want to be able to write to them.
read only = no
At the very bottom of the smb.conf file, add these lines:
[share]
Comment = My Pi shared folder
Path = /xfer
Browseable = yes
Writeable = Yes
only guest = no
create mask = 0777
directory mask = 0777
Public = yes
Guest ok = yes
The ‘Path=’ line needs to be changed to match the folder you created and want to share. Also, if someone accesses the Samba server without a username and password, they are treated as a ‘guest’ and allowed whatever access guests are configured to have. If you don’t want any access to users without credentials, then change the ‘Guest ok=’ line to ‘no’. I’m not going to ask the less technically inclined people in my household to log into this, so I left it as ‘yes’. I’ll have to rely on my network security to make sure only friendly people are on my network in the first place. It’s a trade-off you have to decide for yourself. Save that file and exit the text editor.
Configuring a Samba User
Samba maintains and uses it’s own set of user accounts and passwords. These are separate from the user accounts on the Pi OS, Windows users, Active Directory users, or any other user accounts. You have the option of setting up a user account for each individual who will access the Samba server, or you can create one shared account. Each account that logs in will have access to the shared folder, and also get its own folder to use. Again, this is a trade-off between user burden and security that you’ll have to make for yourself. You do need to create at least one Samba user account. The easiest thing to do is to create a Samba user account with the same name as your Pi user account. Or you can create accounts for each member of your household. Run smbpasswd as root to create users. The ‘-a username’ command line option means ‘add username’. For example:
user@piname: ~$ sudo smbpasswd -a pi
This creates a Samba user named ‘pi’, and will prompt for a password. Do this for each Samba user you want to create. When they access the Samba server they’ll be prompted for their user name and password, and if you allowed guest access they’ll have the option of skipping the credentials and accessing it as a guest.
The last thing to do is to restart the Samba server. It’s actually already running, and it’s configured to automatically start when the Pi boots. Run this command to restart the Samba server:
user@piname: ~$ sudo /etc/init.d/smbd restart
That’s it for configuring a Samba server on your Raspberry Pi. Now let’s put it to use by using some Samba clients.
Windows Samba Client
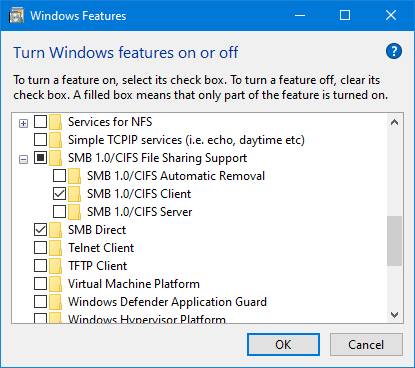
Now that I have a place to store files so that I can share files between my Windows PC and my iPad, I need to put some files there from my PC. Windows has an SMB client in it, but depending on your version of Windows it may or may not be enabled by default. To enable the SMB client in Windows, open the Control Panel and click Programs. In Programs, click on “Turn Windows Features on or off”. Different Windows versions label it slightly differently, “Windows Features” is what you’re looking for.
Expand the “SMB 1.0/CIFS File Sharing Support” option, and select only “SMB 1.0/CIFS Client”. If the naming is different, “SMB Client” is what you’re after. The Pi is already the SMB server. Fair warning: Windows will have to restart to finish this installation.
Once you’ve enabled the SMB Client on Windows, open a File Explorer window and click on “Network”. In the Computer section, you should see your Raspberry Pi’s computer name. Double-click that, and you should see the shared folder. You may have to provide credentials of the Samba user you set up above.
Now, just drag and drop or copy files to the Pi as you would any location in Windows File Explorer. They’ll be transferred to the Pi and stored on the SD card. Be patient, remember you’re storing an SD card in this case, not a hard drive somewhere. It can be slow.
Accessing Raspberry Pi Samba Share From iPad
Make sure your iPad software is updated to at least version 13. You can see your current OS version in the Settings app by selecting General>About and looking at the line “Software Version”. The SMB Client ability was added in that version.
To use the SMB Client capability, you use the Files app, which comes bundled with iOS. Open the Files app and click on the three-dots icon next to the word “Browse”. Select “Connect to Server”. Enter the IP address or computer name of your Raspberry Pi. You then may have to enter your Samba credentials or access it as a guest depending on how you configured the Samba server. You should then see the shared folder and your user’s home folder.
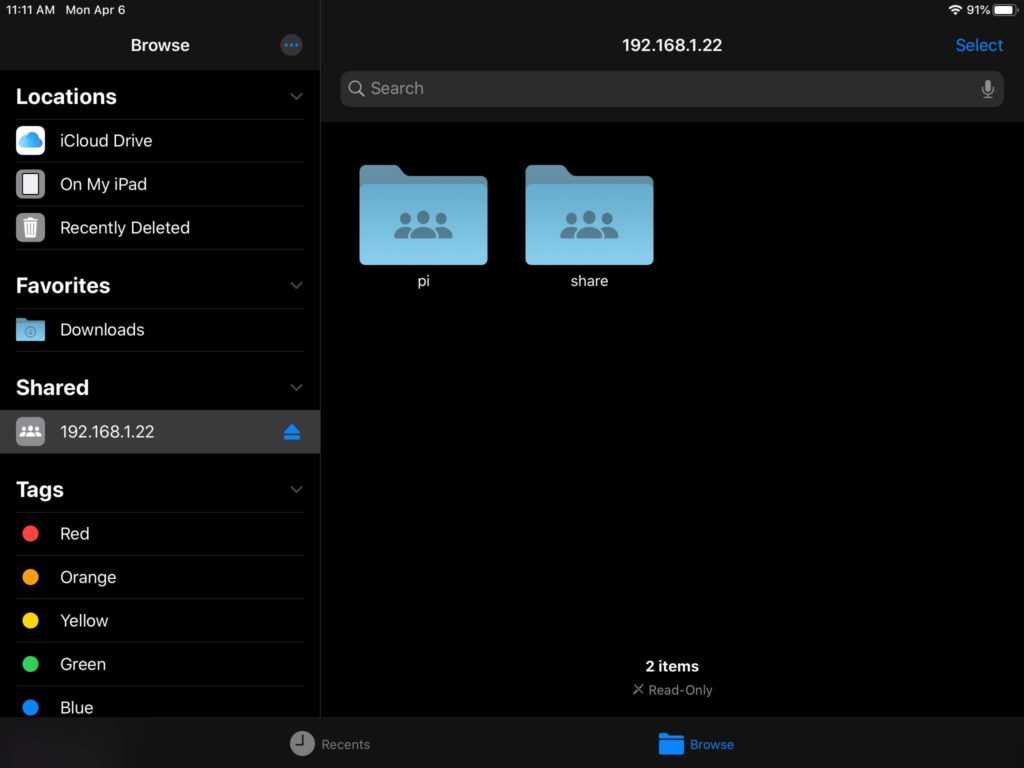
From your iPad, you now have access to the files you transferred to the share from your PC! You can use this as a kind of ‘parking spot’ to transfer files back and forth between the PC and the iPad. By the way, this works for your iPhone as well, starting with iOS version 13. Happy reading-in-bed!