How To Build an Arduino Alarm Clock Using DS3231
This DS3231 Library makes writing an alarm clock application easy. Complete example code ready for you to customize for your own hardware.
If you’re looking to build an alarm clock with an Arduino and the DS3231 Real Time Clock module, this is exactly what you’re looking for. And if you’re looking to brush up on Arduino programming in general, this is exactly what you’re looking for.
I’ve written about the advantages of using a DS3231 real-time clock in your Arduino project, and I’ve described how to connect and communicate with DS3231 using Arduino. Now I’ll show you exactly how to build something you can use.
I’ve created highly documented code which will walk you through how to write an Arduino alarm clock application. Using a library I’ve created just for that purpose, I’ve created an example Arduino alarm clock sketch which demonstrates completely how to implement a fully functional alarm clock using the library.
- The code itself is heavily commented to help you follow the logic.
- Variable names and routine names are intuitive.
- Any code which is dependent on display or input devices is separated from program logic and DS3231 interface routines, making customizing to your project a snap.
- I’ve embedded “TODO:”‘s in the code to identify areas where you may have to customize the code for your hardware. Just search for “TODO:” in the code and make it your own.
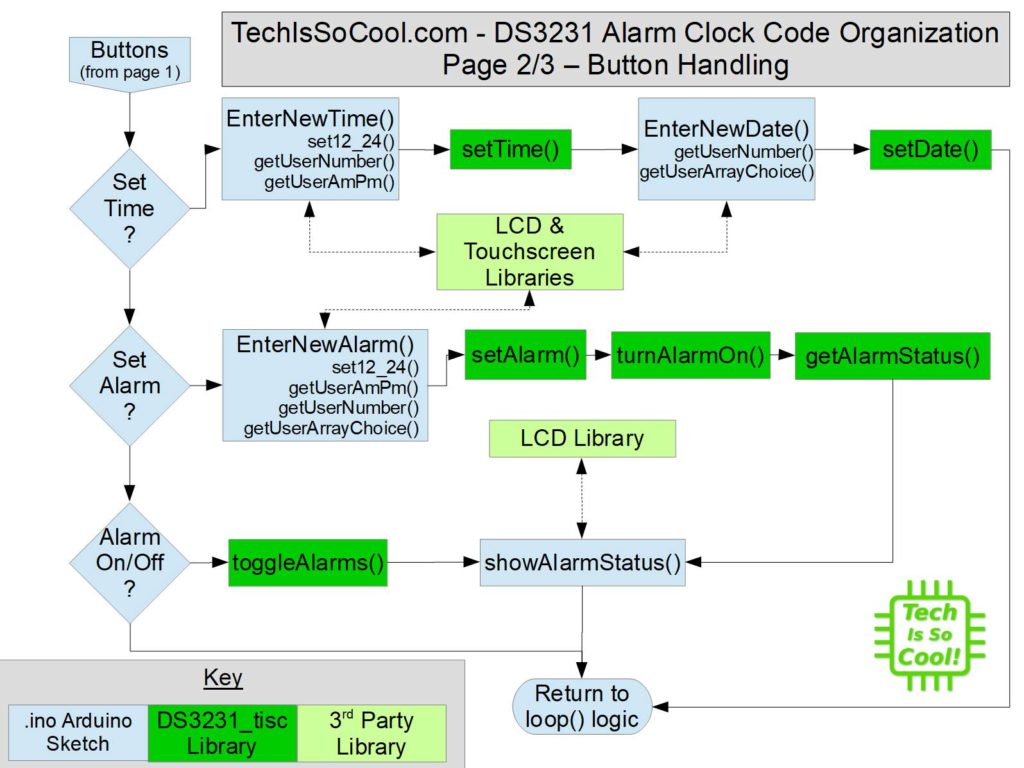
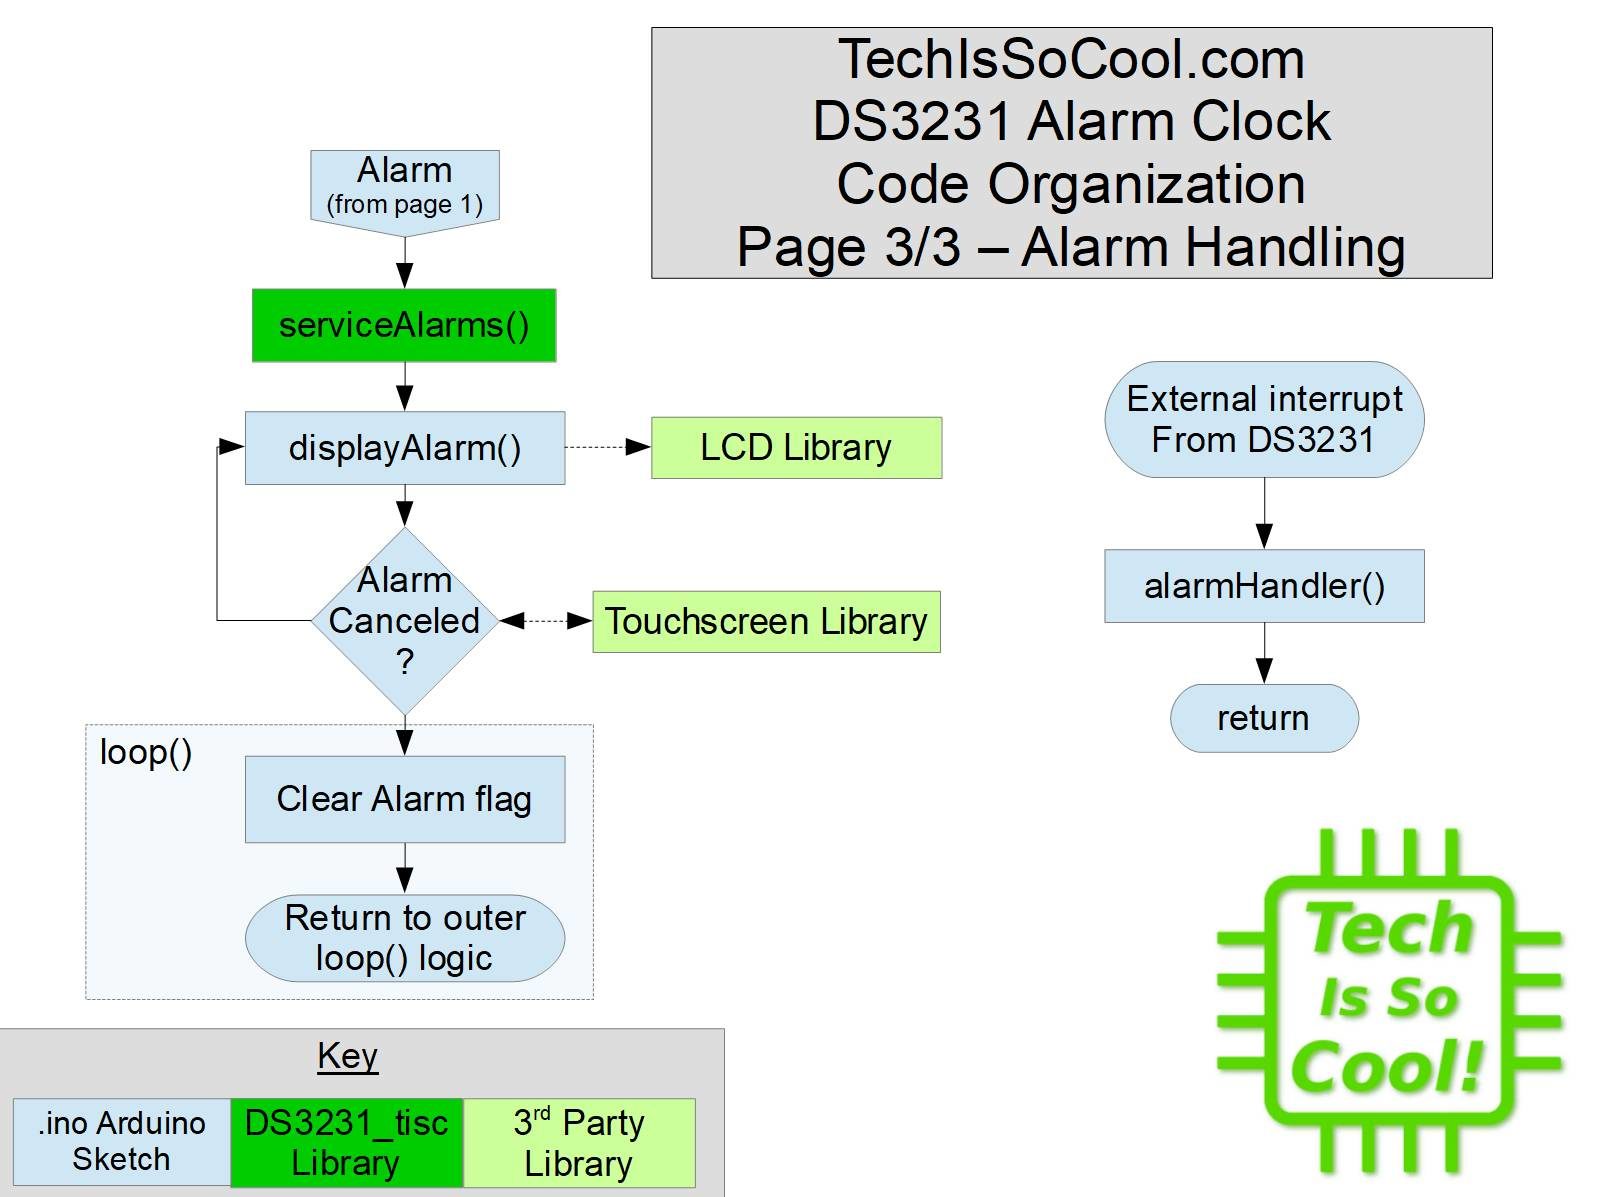
- I’ve also created a high-level flowchart to demonstrate what’s happening in the code, and where each major routine comes into play.
This code is written with an Arduino Mega2560 and a 9486-based 3.5″ LCD touchscreen. It can easily be adapted to another LCD screen, a 2-line LCD, or even seven-segment displays and LED indicators for output and pushbuttons for input.
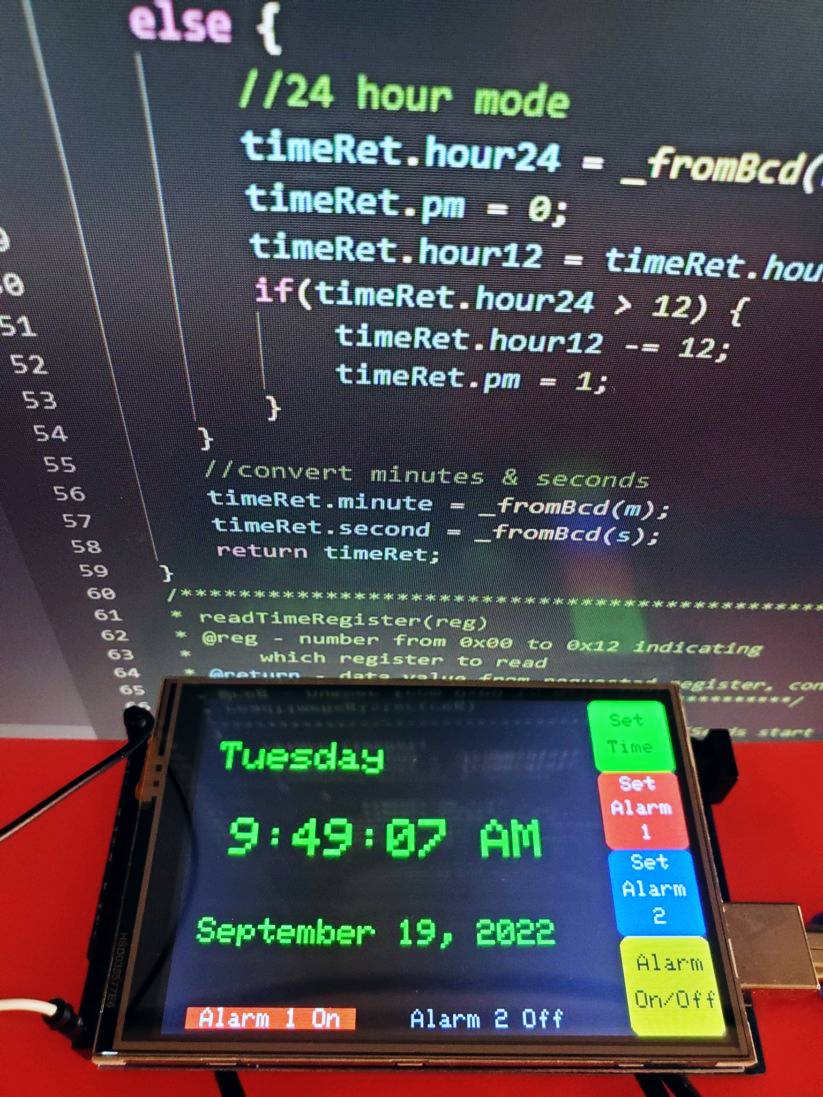
The clock as implemented here has a main screen which displays the time, day, and date. It also provides four buttons for the user: Set Time, Set Alarm 1, Set Alarm 2, and Turn Alarms On/Off. There are two indicators, one for each alarm, displaying whether that alarm is on or off. While this is all done on one screen here, you could easily build this with a seven segment display, two LEDs, and four PCB mount buttons. Or a 2-line display and a remote control. Or whatever hardware you want to use!
When an alarm is triggered, the routine in this code simply displays the alarm by flashing the screen until the user cancels the alarm. This routine could also easily be made to sound a piezoelectric buzzer, turn lights on and off, anything you like.
I wrote this code to accomplish two goals:
- Provide a DS3231 library C++ library which can be used in any application implementing an alarm clock
- Provide a heavily documented example of coding for those trying to improve their programming, Arduino or otherwise.
I welcome any constructive feedback you have on this code. Please email me. Before you do, let me say that the library doesn’t provide any routines for the temperature compensation or square wave generator function of the DS3231. The temperature compensation function would only be needed in rare scientific applications, the DS3231’s internal compensation is more than accurate enough for an alarm clock. The square wave might be fun as a blinking seconds indicator or something, but it shares the interrupt pin which is used for alarms. This library uses the interrupt capability, so the square wave is not an option.
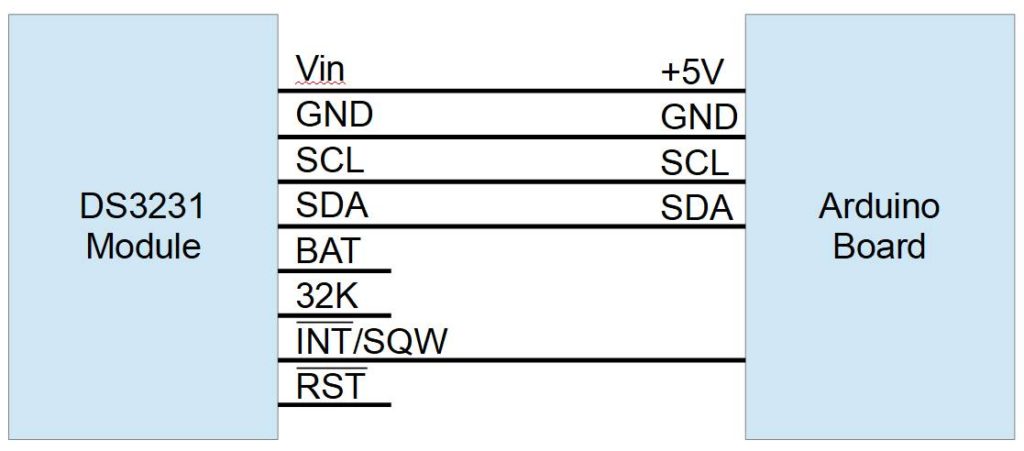
Connecting The Arduino and DS3231 Real Time Clock
Connecting the Arduino to the DS3231 module is very simple. No external components are required. You need only connect the power, ground, I2C bus, and the interrupt pin. The pin numbers on your Arduino will vary depending in the Arduino board you are using. Make sure the interrupt pin on the DS3231 is connected to an Arduino pin which support interrupts. You can see which pins those are for your board on the attachInterrupt page of the Arduino Reference. The wiring diagram is simply this:
Arduino Alarm Clock Software
The software consists of these modules:
- DS3231_tisc (.h and .cpp) – This library provides the routines to interface with the DS3231 at a sensible logic level for an alarm clock application. Any reading and writing of values to the module are handled by routines in this library. It makes use of the Arduino Wire library for I2C communications.
- DS3231AlarmClock.ino – This is an example Arduino sketch which implements a fully functional alarm clock. Any routines which get user input or display information to the user are separated out so that they are easy to rewrite for your application hardware.
The software can be downloaded on Github.

https://github.com/TechIsSoCool/DS3231_tiscArduino Alarm Clock Software Main Loop
The main loop of the software simply updates the time and date display with new readings from the clock module, checks for button presses from the user, and checks to see if interrupt was triggered by an alarm.
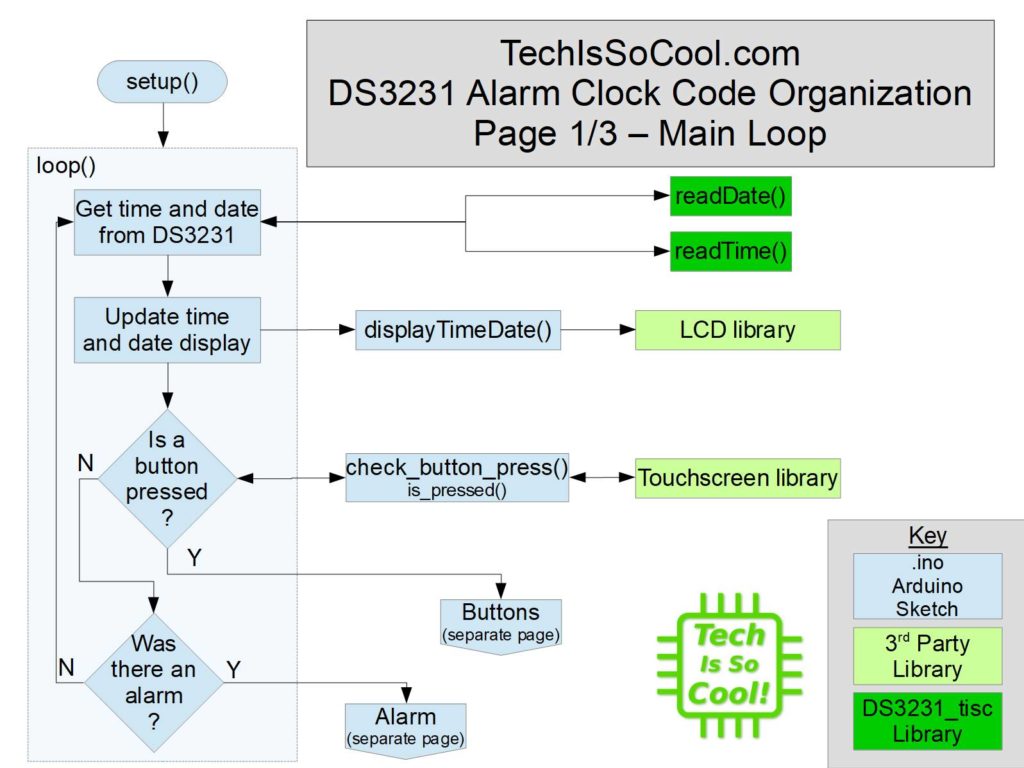
Processing User Input
When the user presses a button, the code checks to see which button was pressed and gets user information and makes settings in the DS3231 module as appropriate.
Handling Alarms
When an interrupt occurs, the interrupt routine sets a flag which is checked in the main loop. When the main loop sees this flag set, it displays the alarm until the user cancels it. That can also be rewritten to return to the main time display while the alarm is going, just write one more routine to cancel the alarm based on user input or timeout.
Please give the DS3231_tisc library a try – I’d like any constructive feedback, use the email address on the Contact page. Mostly though, I’d love to see what you build with it! Please share here, on Twitter, or on the TechIsSoCool Facebook page.
For reference, here’s the hardware used in creating this:
Here are some handy related links:
- Arduino Mega2560 R3 board by Elegoo – a clone, but is working great for me, and inexpensive
- Adafruit DS3231 Precision RTC Breakout – Get the Adafruit version, this is not the part to save money on.
- CR1220 Batteries – for continued timekeeping when not powered externally
- Breadboard – If you don’t have any, here’s some inexpensive ones
- Breadboard Jumper Wires – The kinds with the connectors are nice to have, get an assortment like this
- DS3231 Datasheet – All the details of the IC
- Adafruit’s DS3231 Learn page – more info and handy links, includes Circuit Python links if that’s your thing.
- Arduino’s Wire library reference – information about compatible boards and functions made available by the library. The code itself is in your \Documents\ArduinoData\packages\arduino\hardware\avr\1.8.2\libraries\Wire\ folder assuming you’ve added the library in the IDE.