
Chat Server For Home Using Raspberry Pi
Setting up an IRC (Internet Relay Chat) server on a Raspberry Pi takes only minutes. With the kids schooling remotely from their laptops, and the grown-ups working from home offices, an in-house chat server is a handy communication tool to have available.
With the kids schooling remotely from their laptops, and the grown-ups working from home offices, an in-house chat server is a handy communication tool to have available. If you want to communicate something without video-bombing their company Zoom call, an in-house instant messaging service is the solution. Good old fashioned IM is finding new usefulness in our lives.
Setting up an IRC (Internet Relay Chat) server on a Raspberry Pi takes only minutes. IRC clients are readily available for Windows, MacOS, and Linux. Once you set up the IRC server, you can use any IRC client to connect, and chat freely among people connected to your home network.
There are alternatives, of course. But those all involve agreeing on a service, setting up accounts, and using internet-based services to route your chats. How cool would it be to have your own private chat service on your network? No cost, no personal information disclosed, no big brother fears, no compatibility issues, no forgotten passwords. Having your own IRC chat server on a Raspberry Pi is quick, simple, and free.
All you need is a Raspberry Pi connected to your home network. The IRC server runs as a service in the background, and doesn’t require much in the way of resources. If you already have a Pi connected to your network, you may consider having that one do double (or triple) duty. I have one now-dated Pi 3B+ which is my Clock/Weather/Traffic device, my Samba share to transfer files between iPad’s and PCs, and now is also the IRC chat server for the house. It handles the load just fine.
Installing the IRC Chat Server
IRCD-Hybrid is an IRC daemon that works on Raspberry Pi. It’s been around since 2012, and is still maintained, which is a good sign it’s safe, stable, and useful. Open a shell command window on your Pi. Use you sudo powers to install IRCD-Hybrid. Warning: This takes a long time – 15 minutes or more.
sudo apt-get install ircd-hybridYour IRC server is installed and running, you’re one third of the way there. Now to configure it so it works for you.
Configuring the IRC Chat Server
As part of the configuration, you’ll need an encrypted password, which you can make using the command line:
makepasswd newpasswordUse your own password in place of ‘newpassword’. You’ll need the output of this command. The password is only for the OP, or operator, of the IRC server. Users won’t need the password to chat.
With encrypted password in hand, it’s time to modify the configuration file for IRCD-Hybrid. You’ll need sudo privleges to edit the file. Use your favorite text editor, here’s the command line for using nano:
sudo nano -l /etc/ircd-hybrid/ircd.confThe -l (lowercase L) option causes nano to display line numbers, which will provide a handy reference here. The line numbers referenced here are for the ircd.conf file as installed on Raspbian. It can differ on other operating systems.
The configuration file is well commented, and you can probably figure out any options that look compelling to you. //, #, and /* */ comment delimiters are supported. Here’s the key things to change to get up and running:
Near lines 60-70:
description = “A plain description of the server”
network_name = “anyname”
network_desc = “This is the network you're looking for”
These values are used in communicating with IRC clients, and won’t really impact anything if you’re not ambitiously planning on coding your own client.
Near line 94:
default_max_clients = 32;This is the max number of clients which can connect to the server. The default is unnecessarily high for a home server. I reduced it to 32 in case it helps reduce memory usage. Actual documentation of the options is hard to come by, so it’s unclear whether this helped or not.
Near Line 215:
In the admin class, enclosed with curly braces
admin {
  name = “Smurf target”;
  description = “Main Server Administrator”;
  email = “<root@localhost>”;
};
You can personalize these if you like. Since all the users will be family members, you can leave them as is.
Near Lines 387 – 453
There are several auth{…} blocks, many or all are commented out with a # at the beginning of the line. Each auth block defines a set of criteria under which users can connect. Each block should contain at least one user and class definition. It may also include flags definitions. The flags are described in the comment near lines 416-429.
You can leave commented out any auth blocks you don’t want to be able to connect. Make sure there is at least one uncommented auth block configured like this:
auth {
  //format is username@host, i.e. you could use “*@*” to allow all
  user = “*@192.168.*.*”;
  class = “users”;
}
Tip: The default auth block(s) include the flag need_ident. This is smart if unknown users are connecting. It can be a problem, depending on the IRC client you use. It requires the user to have additional software installed (namely identd). Not all IRC clients have identd built in. Since this server is only accessible internally, you can omit that flag. In fact, you can omit all the flags as in the example above.
Near Lines 466:
Inside the operator {…} block, allow yourself to connect from anywhere in the network:
user = “*@192.168.*.*/28”;Near line 475:
password = “237h2307h”;This is where you enter the value you got from makepasswd above.
That’s all the configuration needed. Save the file and exit the editor, Ctrl-X, Y, Enter, if you’re using nano.
Now, restart the service so it re-reads the configuration file:
sudo /etc/init.d/ircd-hybrid restartNow for last link in the chain – the clients.
Installing IRC Clients
There are many IRC clients you can use to chat using your new IRC chat server. I recommend using Pidgin for Windows and Linux. Pidgin has been around forever in internet-years, and supports a wide array of chat protocols. It’s also free forever, no ads, no upsells, no premium accounts. Pidgin recommends Adium for Mac OS X, which uses the core of Pidgin.
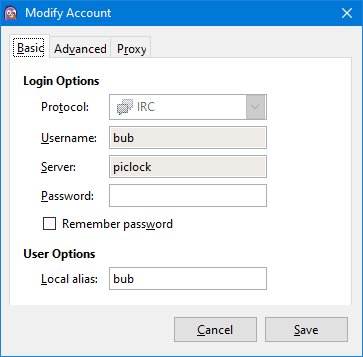
For Windows and Linux machines, download and install Pidgin. When you run it, you will be prompted to add an account. If not, select Accounts>Manage Accounts, then Add…
In the Protocol dropdown, select IRC.
In the Username input, choose any username (you included “*@192.168.*.*” as an authorized user, so any username is acceptable.)
In the server address, enter your Pi’s IP address (You can use “hostname -I” on the Pi to find it)
You can leave the password blank
The Local alias is what will appear in chat’s as your name.
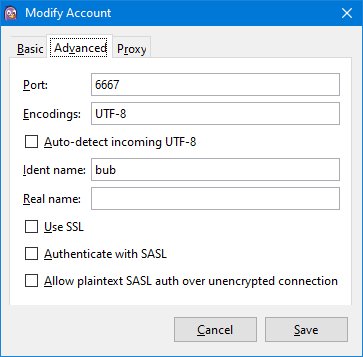
On the Advanced tab, verify Use SSL is unchecked.
Click Add (or Save if you’re changing instead of adding).
Close the Manage Accounts Dialog.
At the bottom of the Pidgin Buddy List window, you’ll see a spinner as it connects to the server, then your status as “Available” once it’s connected.
You can Add Buddies by selecting Buddies>Add Buddy. Select your account, enter their username, and click Add. When that person signs in with that account, their status will show up in the Buddy List. You can double click the username and start a chat. To see them listed when they’re offline, check Buddies>Show>Offline Buddies.
That’s it – now you can chat with your family members without embarrassing them by interrupting their Zoom calls!
Main photo credit: Chat Vectors by Vecteezy