DIY Voice Reminder Device
A simple to build DIY Voice Reminder Device, step by step. Uses ATtiny85 and DFRobot Voice Module.
Everyone needs to be reminded of something every so often. Summer is here and it’s a hot one! It’s especially important this time of year to drink enough water, for example. Or maybe you want to be reminded to stand up from your desk (or sit down if you have a stand up desk) for a few minutes every hour. For some it’s easy to get ‘in the zone’ doing something and forget. For others, it’s just easy to forget things.
An automatic periodic reminder would be really handy in cases like these. I’ve created a simple and inexpensive DIY voice reminder device that any electronics enthusiast can replicate for themselves. I record a short voice reminder, and it plays the recording back to me on a schedule I determine.
The DIY Voice Reminder Device consists of three basic blocks:
- A voice recorder / playback module based on the ISD 1820 IC
- A micrcocontroller to trigger the playback of the voice reminder on a pre-programmed schedule
- 5VDC Power supply
You can add a speaker if you like. The voice recorder / playback module I used has an amplified output connector for a speaker, and a headphone style jack output. I wasn’t satisfied with the results I was getting from the amplified speaker connection. I decided to use the headphone jack and connect it to an extra set of powered PC speakers I had lying around. The quality is fine.
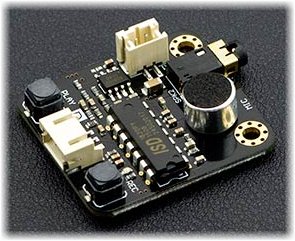
Voice Recorder / Player
There are many different makers of these modules, and they are fairly similar. I bought this voice recorder module from DF Robot. The features I am using are:
- The built-in PCB-mounted microphone
- The Record pushbutton
- The connector with Playback logic control, power, and ground connections.
- The mini-jack headphone out connector
Micrcocontroller
I initially prototyped this with an Arduino Nano. It’s super-simple, everything worked fine. The Nano is a huge overkill for this project. I wanted to scale down (and keep my Nano for something more challenging) The microcontroller only has to set the Playback signal high, hold it for a second, then set it back to low, wait for whatever interval I program it for, and repeat. It really only needs a single I/O pin. So I went for the smallest microcontroller I could find, the Atmel ATtiny85. It has 8 pins. I literally need more pins to program it than I do to use it in this project.
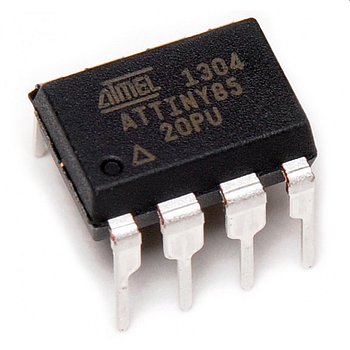
One of the compelling characteristics of the ATtiny series for this project is that you can use your Arduino IDE to do the coding, and then use your Arduino as a programmer to upload your code into the ATtiny. If you have the Arduino IDE (which is free), and any Arduino, you have everything you need to use the ATtiny series. There’s no need to purchase more development tools.
Power Supply
The voice recorder / playback module requires 5 volts DC. The ATtiny is happy with 3.3 or 5 volts up to 10MHz, above that it requires 5 volts. So it works out that a single 5 volt supply is good for both of them.
I prototyped the DIY voice reminder device using a 9 volt battery and one of these buck converters. I highly recommend having a handful of these buck converters on hand. They’re very easy to use to get you up and running on a project when you don’t want to focus on the power supply design. Just solder a 9v battery clip to the input and connect a battery. Put your DC volt meter on the output pads, and turn the potentiometer until you have the voltage out you want, 5 volts in this case. Literally, get a 6-pack of these:

The 9 volt battery lasted just over a day, and that wasn’t feasible, so I looked for a more permanent solution. Besides, I wanted my buck converter back.
I salvaged an AC transformer out of a thrift store clock radio that connects directly to 120VAC and outputs 7.5 VAC. I pass that signal through a full-wave bridge rectifier of 1N4004’s to rectify it, and run that output through an LM7805 5 volt regulator to get my 5 volt supply.
I’ve looked everywhere for a link to or specs on this transformer to share and can’t find any. So I came up with a better option you can use: just get a simple 5 Volt wall adapter. That means you can just buy a mating connector, and don’t need the rectifier or the voltage regulator.
So there are three options for power. However you do it, get a decently regulated 5 volts at maybe 500mA or better. The ATtiny85 will only use about 6mA at 10MHz with a 5 volt supply, but the voice recorder module will need quite a bit more, especially when driving the speakers.
DIY Voice Reminder Device Schematic
The connections are straightforward. One I/O pin on the microcontroller needs to connect to the voice recorder/playback module. Don’t use the RESET pin, according to the datasheet, it’s a weak I/O pin.
I used pin 3, which is PB4 on the ATtiny. When programming the ATtiny, that pin is unused. That way I could have the ATtiny in the circuit while programming it and the voice reorder module wouldn’t interfere. The same is true for pin 2 which is PB4.

In addition to the power supply, the microcontroller, and a connector for the voice recorder module, I added two other items to the schematic. The first is a programming connection. It’s similar in function to the ICSP connector on Arduino boards. The connector provides a way to program the ATtiny in place.
The second item is a wire and pushbutton to parallel the Record button on the voice recorder. The voice recorder has two buttons: Playback and Record. The Playback function is prewired to the connector on the module, the microcontroller controls that signal. The record button has no accessibility except for physically pushing the button, which I intend to enclose in a case. The Record button simply connects a pin of the IDS 1820 IC to Vcc through a pull-up resistor. I want to parallel that button with my own button that I can mount in the panel of my case so that I can record new messages into the DIY voice reminder device. That’s the additional wire and pushbutton you see on the schematic. I’ll put a hole or hole pattern in the case above the module’s built-in microphone to complete the ability to re-record the reminder.
DIY Voice Reminder Device Code
As I said above, the code is super-simple. Every time the microcontroller holds the Playback line high for a second the module plays the pre-recorded message. I named the pin that does that TRIGGER, and I hold it high for 1.2 seconds just to be safe. I define an INTERVAL, which is how many minutes the device will wait between triggers.
#define TRIGGER 4     //The port B logical pin connected to playback
#define INTERVAL 15     //How many minutes to wait between reminders
void setup() {
    //Set the trigger up as an output
    pinMode(TRIGGER, OUTPUT);
    //Get the pin into some known initial state
    digitalWrite(TRIGGER,0);
}

void loop() {
  //Trigger first, or you'll wait 15 minutes to know if it's working
  digitalWrite(TRIGGER, 1);
  //Wait for the duration of the trigger pulse
  delay(1200);
  //Write the pin low again
  digitalWrite(TRIGGER,0);
  //Wait for INTERVAL minutes
  delayMinutes(INTERVAL);
}

void delayMinutes(int mins){
  int i = 0;
  int j = 0;
  for(j=0; j<mins; j++){   //mins minutes
    for(i=0; i < 60; i++){   //one minute
      delay(1000);   //one second
    }
This functionality is overkill even for the tiny ATtiny, and to be honest I feel guilty using all the horsepower it has to do this simple task. I just keep reminding myself it’s only 8 pins and it’s inexpensive, so I’m not really wasting much.
Does This Even Call For a Microcontroller?
I know what you’re thinking now: “I could do this with a 555 timer configured as an astable multivibrator!”, right? And you might be right. I started out making this with a 555 timer instead of a microcontroller. The problem I ran into is that at very lopsided duty cycles, like 1 second every 15 minutes, the interdependence of the component values forces impractical configurations. I used the handy-dandy 555 astable calculator at Ohms Law Calculator to figure it out. Here’s what I ended up with:
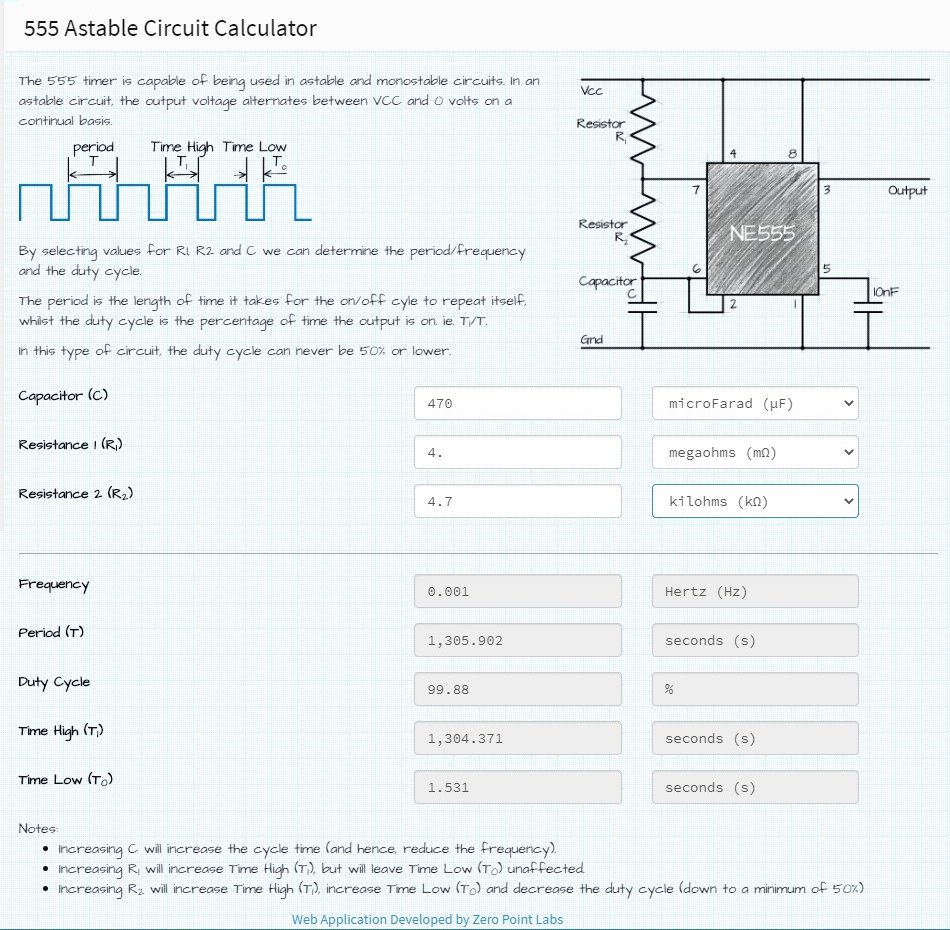
I built that circuit and connected the output (using a transistor circuit to invert the logic), and it did not trigger the voice playback, I never figured out why. My guess is that the 4M and 4.7K resistor values are just so far apart that the circuit isn’t able to do what it is intended to do. Impatience won out and I decided to solve it in code instead. If you’re up for a challenge, show me this working with a 555 timer. I’ll give you your very own post on this site to brag about it.
Programming the ATtiny from Arduino
This step in itself is the topic of an entire post. And there are several posts out there which already explain how to do this. I don’t want to just copy what someone else has written. I do have some value to add to the process. Once I write that up and post it, I’ll link it here. In the meantime, know that you can program the ATtiny from the Arduino IDE, using whatever Arduino you have lying around as a programmer.
- You have to add support for ATtiny to the Arduino IDE
- You make the proper connections from the Arduino the ATtiny – you can use any digital I/O pins on the Arduino to connect to the ATtiny pins I show connected to the ISP/PDI connector in the schematic above.
- Using the Arduino as ISP sketch, you define your pins and upload the ATtiny ISP bootloader to your Arduino
- Then you upload your code to the ATtiny via the Arduino
The Arduino Project Hub has documentation on the process of programming an ATtiny85 using an Arduino Uno. I used an Arduino Mega2560 following this tutorial on Instructables. There’s also an Instructable for the Duemilanove and another for the Nano.
The Build
I built the circuit up on a prototype PCB out of this kit. This is another handy thing to have on hand. When you’re to the point in a project where the breadboard is little too temporary, and you aren’t so committed that you’re ready to make PCB’s, these prototype PCB’s are what you need.

I used a female 2×3 socket for the ISP/PDI connection so that I can use breadboard wires to connect an Arduino as a programmer. Always use a DIP socket for IC’s. I used one for the ATtiny so it could be removed and replaced at will, and for the off chance that I blow it up somehow. A simple header works to connect to the voice module since it already has a connector on it.

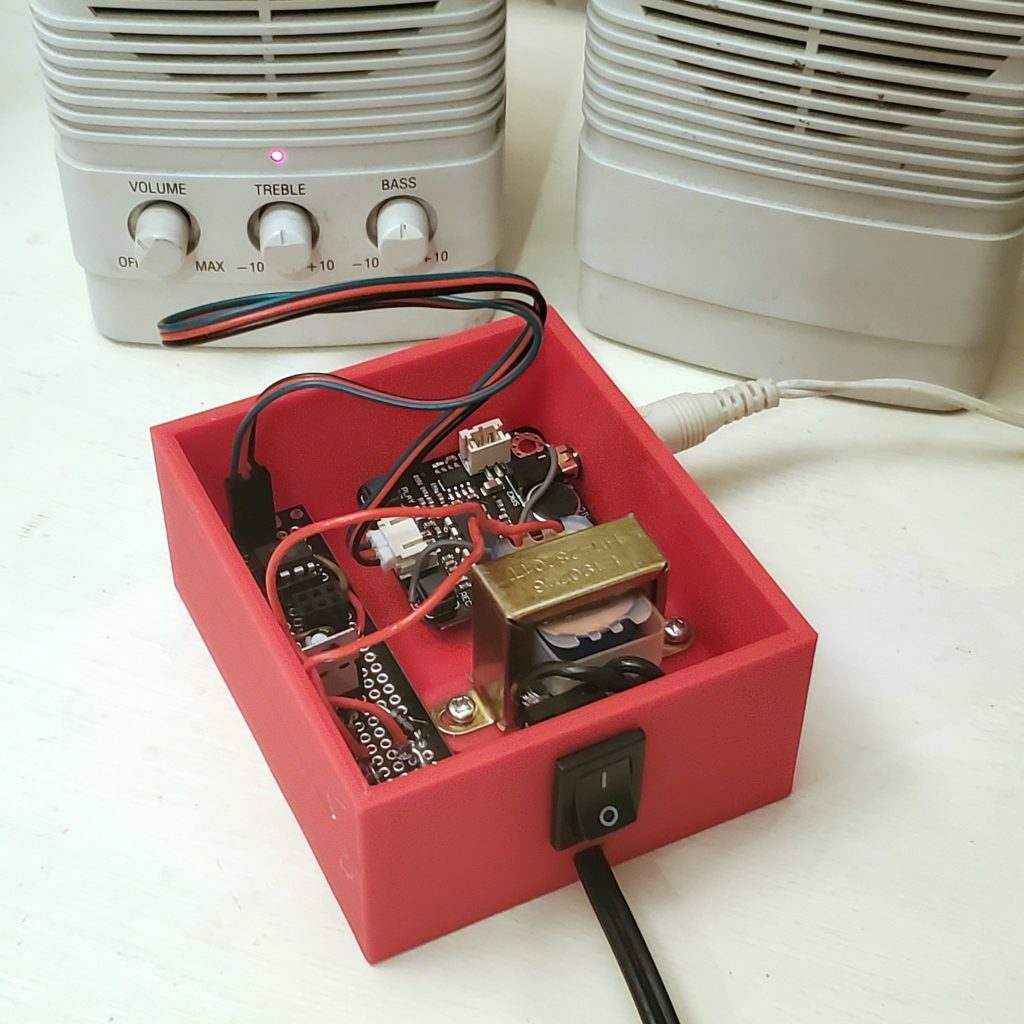
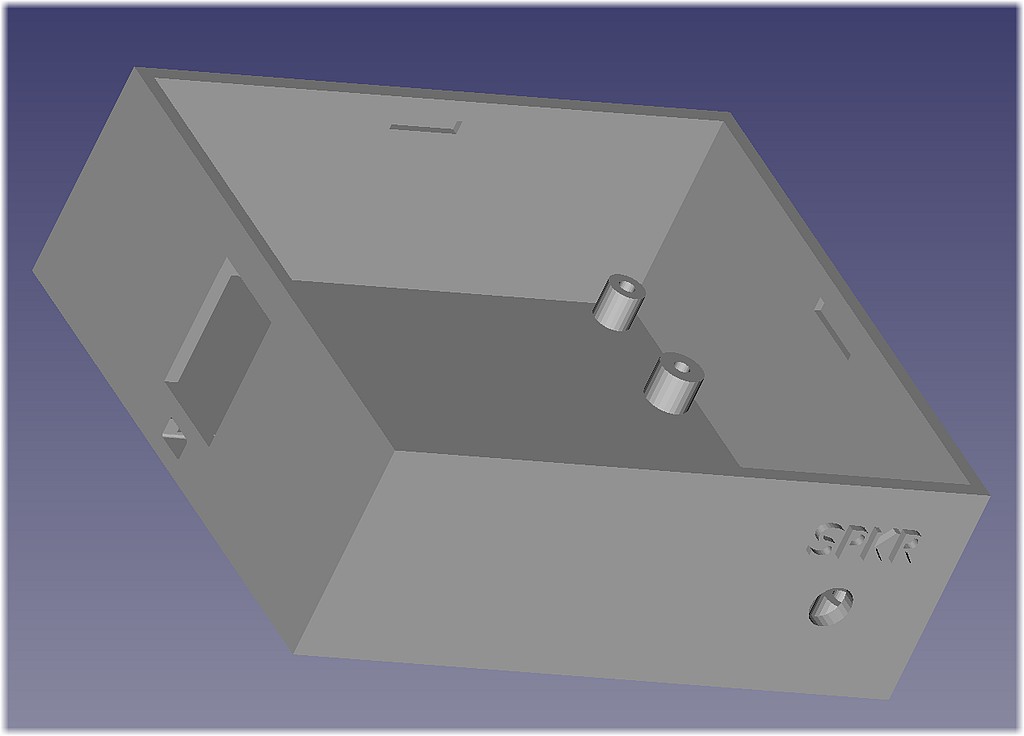
I have three big pieces now: the transformer, the voice recorder / playback module, and the prototype circuit board. To hold these together in one cohesive unit, I decided to design my own custom enclosure. There are a lot of project boxes on Amazon which are suitable if making your own isn’t for you. I’m trying to improve my mechanical CAD skills and my influence over what my 3D printer makes, so this was a good project to do that.
This is a simple box with standoffs for screw holes in the appropriate places, and openings for the power cord, on/off switch, and headphone jack. I put indents just below the top edge of the box so that I could design a snap-on lid with tabs to mate to the indents. The outer measurements of the box are 3” x 3.5″.
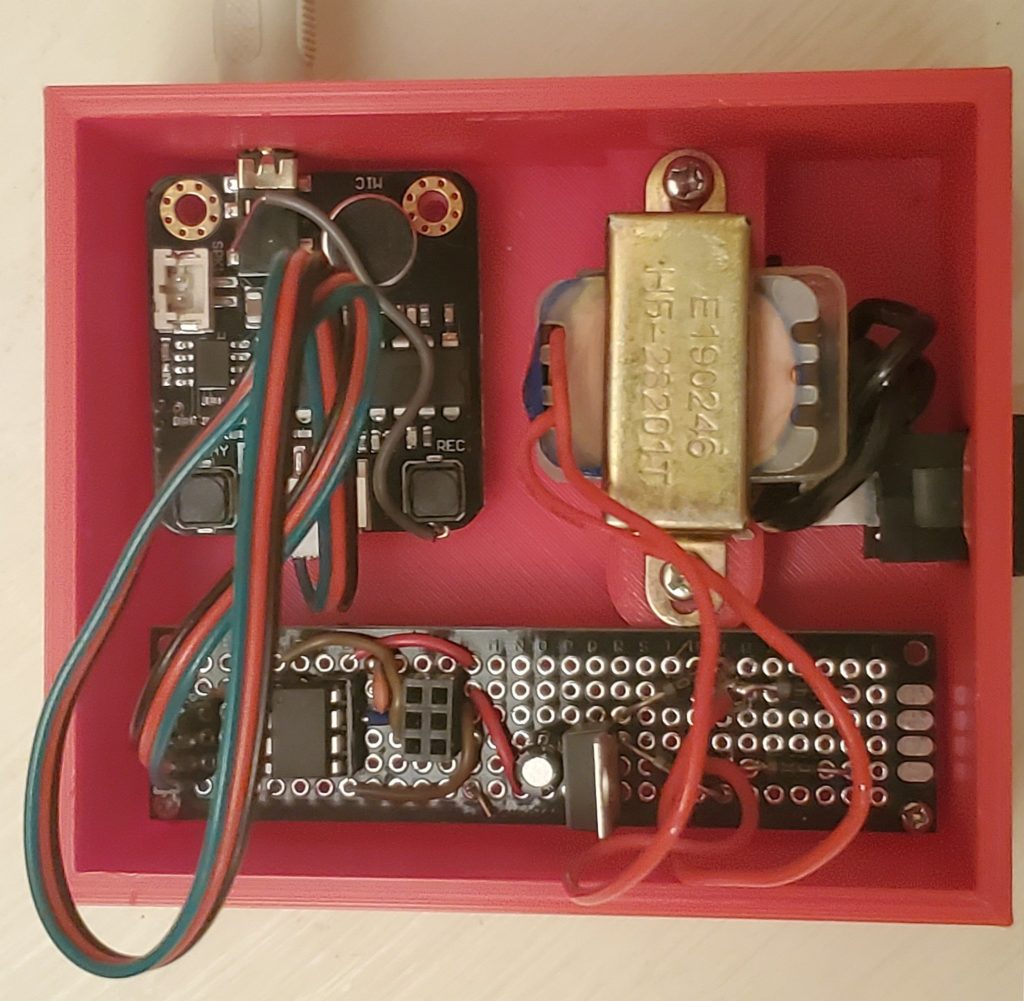
Here’s the actual printed case, with everything installed.
DIY Voice Reminder Device To-Do List
I still want to add a microphone hole and the record pushbutton in order to be able to change the recorded message in the future. Some additional features might be:
- Adding a power LED would provide a nice user assurance that it’s plugged in and working. If the ATtiny controlled the LED, and blinked it twice at power up, that would give me more confidence that the processor reset and the code is running.
- It would also be nice to be able to change the reminder interval by pressing buttons instead of reprogramming it. That also means some sort of of display or other user feedback to let them know what the current setting is.
- Adding a Bluetooth module you may be able to set the delay and transmit the audio to a Bluetooth speaker
- What else?
If you find some inspiration in this project and decide to build something along these lines, please share it with us on the TechIsSoCool Facebook Page – we would love to see it!
Shopping List
| Item | Buy Link |
|---|---|
| Voice Recorder / Playback Module | Amazon Banggood |
| ATtiny85 Microcontroller | Amazon Banggood |
| 5VDC Wall Adapters | Amazon |
| Prototyping PCB Kit | Amazon Banggood |
| DIP Socket Kit | Amazon Banggood |
| Header and Connector Kit | Amazon |
| Diode Kit | Amazon Banggood |
| LM7805 5VDC Regulators | Amazon Banggood |
| Electrolytic Capacitor Kit | Amazon Banggood |
| Buck Converters | Amazon Banggood |
| Ardiono Mega2560 | Amazon Banggood |